King and Rook Checkmate against Lone King is easy to master if you learn the basic ideas.
The actual completed Checkmate … what will it look like?
This animation shows four completed King and Rook Checkmate examples. The yellow boxes show the squares which the White King is Blocking – preventing the Black King from escaping out of Check. Remember that Kings cannot legally be closer than two squares apart (in any direction). Therefore, the position of the Kings (relative to each other) is very important in the King and Rook Checkmate.

Possible Stalemate positions to Avoid!!
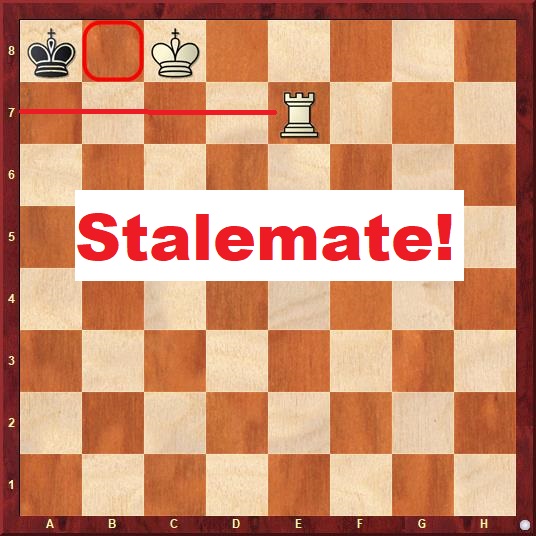
With King and Rook there are only a limited number of Stalemate possibilities. In all cases, a Stalemate only occurs when the Opponent’s King is in one of corner squares (a1, a8, h1, h,8). This animation demonstrates Stalemate possibilities by example.

Another Stalemate Position example with just a King and Rook vs. King
What does Direct Opposition between the Kings look like?

The use of Direct Opposition between the Kings
Direct Opposition between the Kings is a positional technique used to limit the squares your opponent’s King can use. This animation demonstrates the important shapes and ideas in Direction Opposition.

Pushing the Lone King to the Edge of the Board for Checkmate
These animations show the important moments where the Lone King is forced to the Edge and Checkmated by your Rook (with Direct Opposition help from your King). More details of the moves and techniques will be shown further below.


How do I begin? Set up the Electric Fence
The simplest way to begin is to Draw a line with your Rook. This is the Electric Fence (the Check-Wall). Decide the shortest direction to push in for Checkmate and cut off the Lone King with your Rook setting up a barrier. This is like a Laser Beam, a Check-Wall, an Electric Fence. Your opponent’s King will not be able to cross this line (because of Check). You may need to create it near the Edge of the Board, or you might have to begin with a Fence in the Middle of the Board.

Choosing where to set up your first “Electric Fence” (“Check-Wall”)
This animation demonstrates some examples of choosing the most efficient Electric Fence to get the quickest Checkmate.

King and Rook Checkmate in Action
Here is an example of a King and Rook Checkmate using the Direct Opposition and Electric Fence Technique

If the Lone King runs Sideways to the Edge …
Then we can change our Checkmating Edge of the Board to be that particular edge.

The Back and Forth Trap … and how to Overcome the problem
A beginner difficulty in the King and Rook Checkmate is what to do when the Lone King steps Back and Forth out of the opposition (left then right then left then right etc). If the exact same position is recreated three times on the board (with the same player to move), a draw can be claimed by the player recreating the position for the third time.

The solution … a Waiting Move (putting your Opponent in “Zugzwang”)
The problem shown in the animation above is that when our King takes the Direct Opposition, the Opponent’s King just side-steps out of the opposition. We need to change the move order so that our Opponent’s King has to step IN to the Direct Opposition. This is done using a waiting move by the rook. When your rook moves, both Kings are still on the same squares, but the move turn for the Kings has switched (as your Opponent has not other piece with which to play a waiting move) has changed. Zugzwang basically means “Not wanting to move, but needs to move because it’s their turn”.

Zugzwang as a useful Tool to Force Direct Opposition
Here are three examples of using Zugzwang to either Force Direct Opposition or Force the Lone King to Retreat in the direction you want to push him. The first two examples show the Long King moving into Direct Opposition. The third example shows the King Retreating immediately.


Here are two more short Zugzwang examples leading to Checkmate


Cut-off and Bounce-Back Techniques
The Cut-Off and Bounce-Back Techniques are demonstrated in these two animations. They are used to limit the Opponent’s King and help reduce the number of moves required for the Checkmate.


Two more Examples of the Direct Opposition and Electric Fence Technique


The Shrinking-Box Technique for King and Rook Checkmate
This technique is very similar to the Shrinking-Box technique for the Queen and Rook Checkmate. This process is described during this lesson: Checkmate with Queen and King vs King.
However, as the Rook does not have diagonal moves or Checks, it may take longer than with a Queen and King.
This animation demonstrates the basic techniques. It is a good idea to also review the lesson on Queen and King Shrinking-Box Checkmate technique.

